Spree 1.3 to Spree 2.1 - An Upgrade Odyssey
Note: a few days after I published this post, the spree team launched a new website. For the moment you have to visit a specific url to get to the spree deployment service: http://spreecommerce.com/stores. Clicking on a store name takes you to a page where you can select the deployment service under the Add Ons heading, and from there follow my instructions in this post.
I’ve also noticed that the team has published an ansible configuration guide. You may prefer to use that if you like ansible, or like having more direct control. There’s a manual configuration guide as well.
Prereqs
Before I get started, if you want to follow along with this post, you’ll need to install the following:
- virtualbox
- vagrant
- ruby (preferably 2.0)
- git
If you haven’t worked with git before, you’ll need to do some basic configuration. It will give you directions the first time you try to use it, so I won’t go over it here.
Also, do your homework on extensions before even thinking about the
upgrade. Visit the project pages for all of your extensions and find out
if they support 2.1. Many extensions don’t keep up with spree or play
catch-up months later. There will usually be a branch of the extension
in git which tracks the spree version, such as 2-1-stable or
spree-2-1. If you’re uncertain, contact the developer and ask. If
there’s no 2.1 extension, ask yourself whether you can live without it
or be prepared to wait for the developer.
Introduction
So this will be a long one. Don’t worry though, if you work seriously with spree, it may save you boatloads of time as it has for me.
I’ve been working with Spree Commerce since version 0.60, about three years by now if I’m estimating correctly. If there’s anything that’s hard about Spree (and Rails in general), it’s upgrades.
So how do you go about tackling such a task? Let me tell you about my situation.
My Store
I run a simple, low-volume store. In fact, you can take a look at it at http://store.diditbetter.com. You can see the code for my store at https://github.com/binaryphile/spree-dibs-2.1. There’s a good readme which goes into some detail on what’s in there, but I’ll go over the basics here as well.
My store tries to stay as vanilla as possible, precisely to make it easier to upgrade. I’ve learned that many plugins get upgraded on their own timetable, if at all. If you want to stay up with the state of the art, you’ll stay away from frivolous plugins and only use what you need.
I use the basic spree theme, which is quite attractive. There’s a spree-fancy theme as well which I haven’t tried but is popular too. I make a bunch of small modifications to the theme, things like changing the logo, removing the spree tag in the footer and adding our Authorize.net seal to the checkout. All of these are basic modifications perfectly suited for using Deface overrides.
I also customize the emails with our branding and add html versions so Outlook users (our primary customers) get the email experience they expect.
Since we only sell non-physical items (software and services), we don’t have need of the delivery step in the checkout. In the past I’ve removed that step from the checkout process, but have had to reinstate it because we use the shipping address for other purposes. I’ve simply configured a zero-cost shipping option instead.
I have a handful of plugins:
- Print invoice
- Email to friend
- Flexi-variants
- A custom referral-tracking module called “dibs-referral”
The print invoice plugin allows us to generate nice-looking pdfs from our orders.
The email to friend plugin adds a simple form which can be used to send an email from any of the product pages.
Since we don’t sell physical products but have lots of variants, the flexi-variants plugin allows us to manage all of the options from the master variant without having to create an explicit variant for every option combination. This is a lifesaver and we wouldn’t be able to run our store without it.
Finally, the referral extension allows our agents to send store links which prepopulate a cart for the end customer, including a session variable which ensures that the agent gets credit for the sale. The customer can also explicitly choose the referral agent in the checkout step.
There are lots of additional tweaks and fixes in the app and in fact, some of the referral functionality is overridden or extended in the app because there were parts which didn’t seem general-purpose enough for us to put in the plugin, which is also open-source.
The Environment
We run our own production environment in-house, so we don’t use any kind of cloud service. Spree is pretty light on resources, so I usually feel it’s over-specced at a couple gigs of RAM and four processors. YMMV.
I use the Spree Deployment Service to configure the production box. The deployment service is awesome and very nearly turn-key. I’ve found a few items I’ve had to tweak for my environment, but I can’t recommend this tool enough. It doesn’t seem to get its due credit in the spree community.
Production runs on Ubuntu 12.04 LTS, which is the only platform supported by the deployment service. Ruby is version 1.9.3. I’ve tried using the deployment service to configure ruby 2.0, but the puppet scripts fail with 2.0. Rather than chase the issue I just decided to move forward with 1.9.3 explicitly.
The web server is unicorn, fronted by nginx. I use the deployment service interface to handle the details of configuration.
The database installed by deployment service is MySQL. It also takes care of installing all prereq libraries with the exception of a JavaScript runtime. Production doesn’t necessarily need a JS runtime, but every once in a while I do some troubleshooting in production which requires it. I install nodejs for this purpose rather than fussing with the rubyracer in the Gemfile. Last I checked, rubyracer had some memory issues and was on its way out as the favored JS engine.
I configure all of these on a single app server. Like I said, I have a small store. The exception is that I use a different proxy server to front the store which I configure separately, so I don’t really use the nginx instance given to me by deployment service.
For deployment, the Spree Deployment Service does you the enormous favor of configuring Capistrano to handle it for you. As a newcomer to Capistrano, you won’t find adequate description of how it works in the deployment service docs, but you’ll get plenty of usage examples here. Capistrano makes deployment exquisitely more manageable and you shouldn’t miss it.
In development, I clone and run my store code directly on my system. I won’t go into the setup of the requirements, which is amply covered in the spree Getting Started guide. You should be able to get an idea of most of it from this post anyway though.
The Development Cycle
My normal development cycle is to work on code using sample data on my development machine. I can even develop adequately on my Chromebook this way, using the crouton sideloader for an Ubuntu environment. Once I’ve gotten everything working with spree’s sample data, I switch the database over to a copy of my production data and test that everything works there as well. This allows me to separate data and migration-related issues into a separate step, one where I know that the data is at issue and not the entire upgrade.
While I work, I’m using a git branch called “staging”. This allows me to drop what I’m doing at any time, in case there’s a bugfix or minor improvement which needs to be done to the store without having to wait for my development to finish. Once I’m done testing in development, I merge staging to master and test again before deploying to the production server.
Actually, there’s one more refinement to that process, one which I recommend. An unfortunate truth is that I’ve frequently run into issues during the deployment phase which didn’t show up in development. Sometimes it’s due to the deployment process itself and sometimes its because problem behavior doesn’t become evident until working with real, non-sample data, or even the due to the configuration of the production machine itself. Sometimes real data doesn’t respond in the right way to migrations, sometimes plugins have altered what the developers would normally have expected of the data. You don’t want these issues to only crop up once you’ve told everyone that there will be an upgraded store tomorrow.
For this reason, it’s tremendously useful to set up a staging server, one which goes through the same deployment process as production, runs the same database system and, importantly, runs the migrations on actual store data. I’ll go through the steps to set up a staging server relatively painlessly. I use Vagrant on my development box for this purpose. That obviously can’t be done on a Chromebook, but it’s nice to have this step take care of those concerns so that my normal development can be done in a lightweight environment.
The Upgrade Process
That brings me to the upgrade process itself for which I take, well, an alternate route. It’s more circuitous, which is why I’m documenting it like this, but what you get in the end is a known quantity.
Why do I imply that the regular process gives you an unknown? Because what you get isn’t the same as what someone else gets and especially isn’t the same as what a new spree store gets. If you follow the directions (which now seem to be regularly provided with spree upgrades in guide format, hooray!), you’ll very likely get a working store after maybe dealing with a few hiccups. Definitely in fewer steps than I’ll outline here.
What you won’t get is the same thing that a brand new spree user does. Your project will be different. It will be generated from the Rails templates supplied when you initially created the store in the way-back. Those files don’t stand still with each new Rails release, sometimes changing significantly. But what the spree guides don’t (and shouldn’t) do is take you through every possible upgrade path for the underlying Rails files. There would just be too many possiblilities. Instead, they tell you the changes which have to be made or else the store won’t work.
Call me a control freak, but there’s a reason for my madness. By going through the effort of bringing the store completely up-to-date, more up-to-date than the guide process, I’m moving myself from one class of user to another. I’m staying with the majority of future users. I can count on the fact that in the future, the spree community will be growing and that there will be more users who’ve created a store on the newer version than the old version with which I started. By keeping my store in line with what the new users have, I’m keeping my store more supportable by being in the mainstream. I’m less likely to experience oddball errors due to crufty configurations long abandoned by the Rails team. I’m willing to go through the effort to keep myself positioned for future support and to avoid the compounding of cruft upon cruft that comes from a normal upgrade.
The regular upgrade process typically involves updating your Gemfile to the latest versions in the appropriate places, then bundling and finally installing and running migrations. This, along with a few edits for key files in your app, represents most of the process. While I’ve never had one of these work as advertised (I always get migration issues), I wouldn’t blame you for skipping my process and going that route. More power to you.
My process involves creating a new spree store, migrating the data and then exporting/importing it into the new store. That way everything is spanking new. The rub is that the data may need some massaging, especially if you’re ditching plugins along the way, but what you end up with is almost exactly a new store. And that’s where I like to be.
The App and the Repository
Let’s start setting up the process. I’ll do it in a way where you can follow along with your own sample store and go through the whole process, minus whatever of mine you want to skip.
First thing we’ll need is an “old” store. I’ll set one up without any plugins, just spree 1.3. I assume you have ruby 1.9 or 2.0 installed. This is on my regular development machine running Ubuntu 13.10:
sudo apt-get update -qq
sudo apt-get install nodejs
gem update --system
gem install bundler rake
gem install rails -v 3.2.16
# Leaving off the version number keeps your app name the same from
# version to version
rails _3.2.16_ new store
mv store store-1-3
cd store-1-3
vim Gemfile
Modify the sqlite3 gem and add the mysql2 gem (or see 1.3 Gemfile gist):
gem 'mysql2', :groups => :production
gem 'sqlite3', :groups => [:development, :test]
Find the unicorn line and change to:
group :production do
  gem 'unicorn'
  gem 'foreman'
end
Find the capistrano line and change to:
group :development do
  gem 'capistrano', '~> 2.15.5'
  # necessary due to a bug in 2.8.0 - if a later version works, just
  # drop this line
  gem 'net-ssh', '~> 2.7.0'
end
Also add these lines at the bottom:
gem 'spree', '1.3.5'
gem 'spree_gateway', :github => 'spree/spree_gateway', :branch => '1-3-stable'
gem 'spree_auth_devise', :github => 'spree/spree_auth_devise', :branch => '1-3-stable'
Exit and run:
# this will throw an error
bundle install --without production test
# this will fix the error
bundle update
bundle exec spree install --auto-accept
Once that finishes, you’ll have a working spree development environment running on sqlite. SQLite is good enough for our purposes here. For MySQL, you’ll have to follow the directions in the spree guides.
You can test the store by running bundle exec rails s and then
pointing your browser at http://localhost:3000/ once it has started
up.
Ctrl-C stops the web server.
Wasn’t that easy? Amazing!
Important Bundler Commands
bundle install- installs gem versions locked by Gemfile.lock, or just the latest acceptable versions of everything if there is no .lock file. When in doubt, this is almost always the safe choice.bundle update [gem]- update a single gem and its dependencies to the latest acceptable version, not updating other gems unless requiredbundle update- update all gems to the latest acceptable version. Be careful with this command, it tends to break things. You can always revert Gemfile.lock andbundle installto undo this.bundle exec [command]- run the command using the Gemfile’s gems as the environment
Setting up Git
Now let’s set up a repo:
git init
vim .gitignore
Add the following lines to your .gitignore (or see .gitignore gist):
/config/initializers/secret_token.rb
/config/initializers/devise.rb
/config/database.yml
/public/spree/
/public/assets/
/.vagrant/
package.box
*.sql
*.tar
*.tar.gz
*.tgz
Save and exit. Next run:
git add .
git commit -m "initial commit"
You’ll also want to set up a store-1-3 repo on github. Go do that then
run:
git remote add origin git@github.com:username/store-1-3
git push -u origin master
Use your own username instead of “username” of course.
The Deployment Service
Now let’s set up a production server for the 1.3 store.
In order to do this, we’re going to use vagrant rather than a true VPS in the cloud or anything like that. So this will be a “fake” production server, just so we can go through it together.
Make sure you’ve got vagrant and VirtualBox installed and working. You should also install the guest additions plugin using:
vagrant plugin install vagrant-vbguestIn the store-1-3 directory, run:
vagrant init precise64 http://files.vagrantup.com/precise64.box
vagrant up
Important Vagrant Commands
vagrant status- status of the current vagrant machine(s)vagrant init- create a Vagrantfilevagrant up- start a vagrant machine, or all machines in the Vagrantfilevagrant up production- start the vagrant machine called “production”vagrant halt- stop a vagrant machinevagrant reload- reboot a vagrant machinevagrant destroy- delete a vagrant machine from diskvagrant box list- list local boxesvagrant package- create a package.box file from the current machinevagrant box add boxname [url|local file]- add boxname to your boxesvagrant box remove boxname- remove boxname from your boxes
Headless VirtualBox
Vagrant runs everything headless, so there’s no need for a virtualbox
gui. However, you may want more visibility than vagrant status affords
sometimes. What if you don’t know which machines you left running?
You can always open the virtualbox gui while vagrant machines are running. You won’t get a console session with the running machines, but you can see their status and perform operations such as powering down.
The only time you need to make sure virtualbox gui is closed is when you’re mucking with machine ids as I note in the aside on dropbox.
While that’s going, you can start configuring the deployment service. Go to http://spreecommerce.com/ and login (register if you haven’t already).
As I note up top, you’ll need to visit http://spreecommerce.com/stores directly to manage your stores for the moment. Looks like this part of the new spree site is still under construction.
Once you’re logged in, go to the My Account section and click the Stores heading. Click New Store.

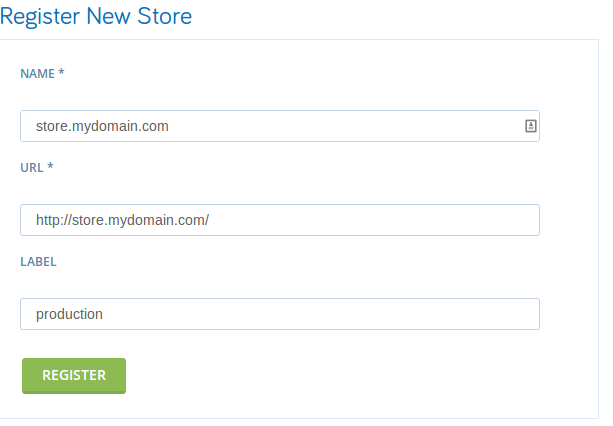
Create a new store and call it “store.mydomain.com”, using your domain instead of that one. The url is arbitrary, just use “http://store.mydomain.com”. Label can be “production”. Click the Register button.
Now under Add Ons, click Add Deployment Service.
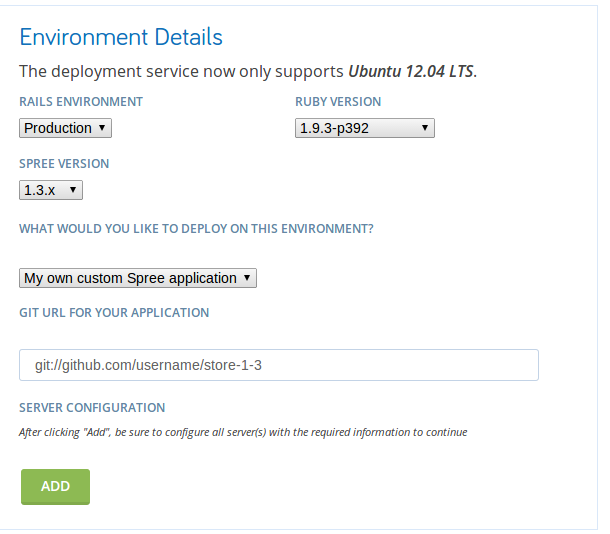
Leave the environment as “Production”. For Ruby Version, choose
“1.9.3-p392”. For Spree Version, choose “1.3.x”. Add the git url for
your repository like: git://github.com/username/store-1-3. Then click
Add.
Note that I’m using the read-only version of the git url. That’s because I never edit code on the production or staging servers and never write from them to the git repo. I don’t store git credentials on a production server anyway, so I wouldn’t be able to.
The Deployment Service and Ruby Versions
Note that I’m specifying ruby 1.9.3 because although 2.0 is strongly preferable, the deployment service’s puppet scripts are not compatible with 2.0 as of this writing. If you select ruby 2.0, your install will fail.
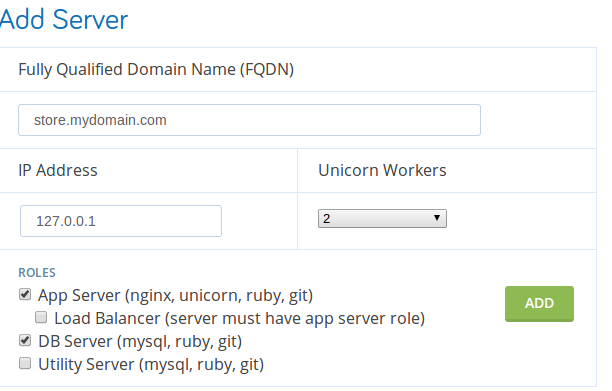
That gets us to the point where the store parameters are known but the server parameters need to be specified. Under the Add Server section, put in a fully-qualified domain name such as “store.mydomain.com” (use your own domain).
For IP, just use “127.0.0.1”. Select the “App Server” and “DB Server” roles, then select “2” for the number of unicorn workers. Click Add.
Unicorn Workers
When you configure the real server, you’ll want to set the number of unicorn workers to the number of cores on your production server or “2”, whichever is greater.
Since that’s the only server we’ll need, go back up and select “Complete” for Configuration Status, then click Update.

At this point you’ll need to wait a minute for the deployment service to generate your configuration. Take a moment to check that vagrant finished configuring your server. You’ll see an error about the window system drivers failing to install, that’s fine because this is a server with no window system.
When you’re ready, run:
# this logs you into the vagrant box as user "vagrant"
vagrant ssh
sudo apt-get update -qq
sudo apt-get install -y curl vim nodejs
Software
If there is any other standard software you like to have installed on your machines, this is a good time to install it. This box will be packaged and redistributable, so get it in there now.
I’ve got a gist of software install commands I like to use for my customized boxes.
SSH Configuration on Non-Vagrant Ubuntu
The vagrant box will already have reverse DNS lookup on ssh connections
disabled, but regular Ubuntu won’t. If you’re using regular Ubuntu, edit
the file /etc/ssh/sshd_config and add the following line at the end:
UseDNS no
Save and exit, then run:
sudo service ssh restartNow:
sudo cp /etc/sudoers .
sudo vim /etc/sudoers.d/spree
Add the line (or see spree sudoers gist):
spree ALL=NOPASSWD: /usr/local/bin/bluepill
Save and exit.
sudo chmod 440 /etc/sudoers.d/spree
sudo -i
This will give you a root login session, which is what the deployment service needs.
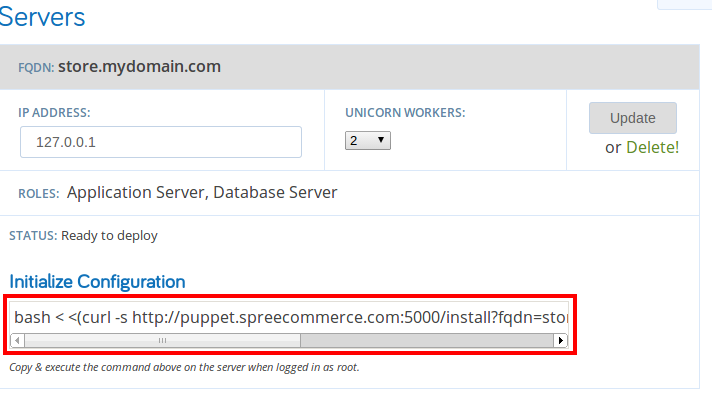
Now go back to the spree site and refresh the page. At this point you should see an Initialize Configuration command under your Server section. Cut and paste this command into the vagrant box, then go get a cup of coffee/tea/etc. Scratch that, go get a meal. This is going to take a while.
You may see some error messages go by while the machine is installing. That’s normal. Unless it crashes with an error, don’t worry about it.
Security
I don’t trust my production system, so I never use it to log in anywhere else on the network. Therefore I don’t usually generate ssh keys on it, although I will add public keys to the authorized list so I can use ssh keys to log into the production machine. Of course, with vagrant you don’t need to worry about that since it already has the vagrant credentials builtin.
I also use password authentication rather than keys to do my Capistrano deployments but you may want to use ssh keys for that purpose. I’m not going to go into that here. If you use passwords with ssh rather than keys, make sure you have some other security mechanism to protect your server from the outside world. For example, make sure that only whitelisted IPs (or no IPs) from outside your network can reach the ssh port on your server. Passwords are not a safe way of securing your ssh server.
There’s probably quite a bit to be said about mysql security as well which I’m not much of an expert on. I make sure that there’s only local machine access to my database and that all of the accounts have passwords. I’ve left root without a password to simplify the instructions here, but take care to secure your mysql instance better than that.
When the install is finished (errors and all), go back to the spree site and visit the deployment page for your store. Refresh the page if you have to.
There will now be a new command available under Update Configuration. Copy and paste it into the vagrant box, replacing the password with what you’d like the database password to be. I’ll set mine to “spree”.
FACTER_db_pass=spree puppet agent --test --certname store.mydomain.comExit the root shell.
The Rest of the Base Box
Now run:
# vagrant password is "vagrant"
sudo cp sudoers /etc/sudoers
# this changes the hostname without rebooting
sudo hostname store
sudo vim /etc/hostname
Remove the domain so there is only a hostname in the file.
sudo vim /etc/hostsChange the entry for “127.0.1.1” to “store” instead of “precise64”.
sudo passwd spreeChange to a password of your choice, such as “spree”. Note that you’ll need a better password than that for a real system, but for vagrant it’ll do.
Passwords
There are two accounts named “spree”:
- the MySQL database account
- the Linux account
We just set the Linux account password. We’ll be setting the MySQL password with a SQL statement below.
I make them match here, but they can be set separately.
The MySQL password needs to match the one found in
/data/spree/shared/config/database.yml, which was set by the
FACTER_DB_PASS part of the prior puppet command.
mysql -uroot
# where this last bit in single quotes is the same as the password
# in the facter command before
grant all on spree.* to spree@localhost identified by 'spree';
exit
sudo gpasswd -a vagrant spree
sudo gpasswd -a vagrant www-data
sudo find /data/spree -type d -exec chmod g+s '{}' \;
sudo vim /etc/login.defs
Change the UMASK line to:
UMASK 002Save and exit. Log off and vagrant ssh back in.
Now:
vim /data/spree/shared/config/database.ymlCopy the “production” section in its entirety to the bottom of the file and rename it “staging”, then save and exit.
cd /data/spree/shared
mkdir spree
cd config
vim secret_token.rb
Paste in the following (or see [secret_token.rb gist]):
Store::Application.config.secret_token = 'my secret is at least thirty characters long'
Store::Application.config.secret_key_base = 'my secret is at least thirty characters long'
Save and exit.
Application Naming
Remember when we initially created the application, and I just called it
store, then renamed the folder to store-1-3? This is why. The
application name is generated from the name used when you created the
app. It takes your name and CamelCases it, removing punctuation. So
store became Store. It’s easier when upgrading when your app name
doesn’t change with the version, so that’s the name we want to use.
vim devise.rbPaste (or see devise.rb gist):
Devise.secret_key = 'my secret is at least thirty characters long'Note that while spree 1.3 does not need the devise.rb file, I’ve set
you up so that you’re ready for 2.1 (which does) without having to
further modify these files.
Secrets
These machines are just for test purposes, so I’m using secrets which obviously aren’t very secret. For a real production machine, you’d want to generate a random secret for each of these files separately, using the command:
bundle exec rake secretYou’d run this command in your development directory on the dev machine, then copy and paste into each file, generating a separate secret for each file.
Also note that the “secret_token” is being deprecated in favor of “secret_key_base” in Rails 4 (which spree 2.1 is based on), but secret_token still works. I’ll be using secret_token exclusively in this post since it’s backwards compatible and these vagrant boxes don’t need production security.
See http://guides.rubyonrails.org/upgrading_ruby_on_rails.html for more information.
Now:
vim master.pill.erbChange the “app.gid” line to:
app.gid = "www-data"Save and exit.
Groups and Setgid
On a production machine, you shouldn’t be sharing an account to administer it, such as the spree account. In order to have proper accounting of who is doing what on the server, accounts should never be shared.
As it happens, vagrant doesn’t want to log in as the spree user anyway, so it’s best just to establish good practices and make it so you can administer spree properly from the vagrant account anyway. While you could sudo to the spree account all of the time, it’s more convenient to allow your admins to work in the spree folder correctly without sudo.
We’ve added the vagrant user to the “www-data” and “spree” groups, which
gives it write access into the /data/spree folder tree. We also need
to make the converse true so that the spree user can use the files
written by the vagrant account.
We’ve changed the default umask so that files we write will allow the
group to have control. The find command above also sets the setgid bit
on all of the directories in the tree so that any files written to the
tree automatically get the shared group assigned, not the user’s default
group.
Finally, we need the spree process on the machine to run with the group
id, rather than group “spree”. That’s what changing “app.gid” in the
master.pill.erb file does.
This setup saves you a multitude of small headaches.
The Vagrant Package
Since this vagrant box will more often be used for staging than for production, we’ll make another change before packaging it up for reuse.
Edit these two files and change “production” to “staging”.
/data/spree/shared/config/Procfile/etc/profile.d/set_env_vars.sh
Also run:
sudo chmod 644 /etc/profile.d/set_env_vars.shNow logout of the vagrant box.
Now we’ve got our “fake” production machine configured and ready to go. Since we’re going to be setting up a staging machine based on the same configuration, let’s take a moment to save our work so we can just clone this box rather than go through the whole setup again.
On your dev machine:
vagrant packageThis will shut down the vm and export it to a file called package.box.
You can then save it in the box archive and give it a name, then switch your current box to it:
vagrant box add spree-base package.boxIf you’re going to distribute this box to other machines or over the net, then move and rename package.box to somewhere outside this directory. Otherwise:
rm package.boxNow:
vagrant destroy -f
rm Vagrantfile
vagrant init
vim Vagrantfile
Comment out the line (or see initial Vagrantfile gist):
# config.vm.box = "base"Before the final “end” in the file, add the lines :
config.vm.define 'production' do |production|
  production.vm.box = 'spree-base'
  production.vm.network :forwarded_port, guest: 80, host: 8081
end
Save and exit.
Now:
vagrant up
vagrant ssh
sudo hostname production-1-3
Use sudo vim to change “store” to “production-1-3” in these two files:
/etc/hosts/etc/hostname
Change “staging” to “production” in the files (use sudo on the second):
/data/spree/shared/config/Procfile/etc/profile.d/set_env_vars.sh
Now logout of the vagrant box.
Dropbox and Vagrant
If you’re like me, you work in multiple locations on multiple computers and use dropbox to pick up where you left off. Vagrant poses a special challenge here, since vagrant needs to agree on machine identifiers with the installed virtualbox. Virtualbox will be different on the two machines. While this is a good thing since it’s difficult to synchronize virtual machines with dropbox, it’s nice to be able to use vagrant seamlessly between the two.
If you bring up your vagrant box on one machine, it will note the
machine identifier in a file in the .vagrant directory. Running it on
another machine with dropbox will confuse vagrant and it will always
overwrite this file with the current machine’s id, which causes
headaches between the two machines.
The simple solution is to force the two machines to agree on an id. Once you’ve brought the vagrant box up on your first machine, issue the following command:
# substitute the box name for "production" if working on a different
# box
cd .vagrant/machines/production/virtualbox
cp id id.bak
Now, bring up the vagrant box on your second machine (say, when you go
home). Once the machine is up, vagrant halt it. Now:
cd .vagrant/machines/production/virtualbox
# note this, you'll need it for the next step
cat id
cp id.bak id
This will tell vagrant to use the same id as on your other machine.
Now make sure there is no virtualbox gui running. Also make sure you did
the vagrant halt above.
There are two more files you need to edit to complete this. The first is:
# this might alternatively be in ~/.VirtualBox/VirtualBox.xml
vim ~/.config/VirtualBox/VirtualBox.xml
Find the machine with the id from the cat id command above, then copy
the new machine’s id in its place (from id.bak).
Also, note the src directory for your machine, since you’ll be going
there next.
Save and exit. Now:
cd ~/VirtualBox\ VMs/[your machine's src directory]
vim [your machine].vbox
Again, replace the machine id. Don’t mix this up for the hard disk id.
It’s in the <Machine> tag, not under it.
Now your machines will both allow you to use the vagrant box and coexist peacefully. If they ever get out of whack, shut them down and copy the id from the id file.
SSH and localhost
One of the things we’re going to be doing a lot of is ssh’ing to the
local machine, since virtualbox and vagrant default to NAT’ing your
boxes through the local ip. This is fine, but ssh is paranoid about the
IP address and actual machine matching up each time you connect. Since
you’re going to use the same IP to connect to multiple boxes, ssh is
going to complain quite a bit if we don’t work around that. I’ve added
the following to my ~/.ssh/config file, which seems to smooth over
ssh’s ruffled feathers without sacrificing security:
Host 127.0.* localhost
StrictHostKeyChecking no
UserKnownHostsFile /dev/null
This needs to go at the top of the file, in my experience.
Capistrano
The most important thing to know about capistrano is that it allows you to control your deployment from your development machine. I had no introduction to capistrano before using the deployment service, so I thought it was something you used while logged into the production machine.
Capistrano uses ssh to connect to the target machine and then does all of the steps you would normally need to do by hand, including updating the git repository, compiling assets and so on.
It additionally maintains separate working copies for each release you do. This is important, because if there were a single working copy from git, any local file modifications would be lost when moving back and forth between releases. Capistrano avoids this issue by keeping each release in a separate directory.
One additional thing to know is that there are at least two situations which capistrano treats in a special way; the initial deployment, which is called a “cold” deploy, and when you have new migrations to run. Both require an extra keyword on the capistrano command to handle those situations. We’ll see that when the time comes.
The deployment service provides you with the capistrano recipe, which gets added to the project directory on the dev machine. We’ll configure it to manage a production server first and when that’s working we’ll add a staging machine into the mix.
We’ve already added capistrano to the Gemfile earlier, now run the
following command to enable it in your project:
bundle exec capify .This will create a couple files, one of which we will replace with a recipe from the deployment service.
Go back to the spree commerce website and go to the deployment service page for the store. Underneath the Environment Details section, under Git url for your application, there is a link to a capistrano recipe.
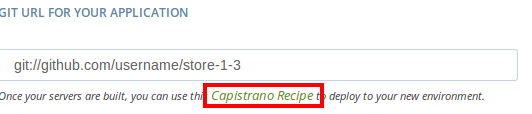
Click the link, then copy and replace the contents of the file
config/deploy.rb in your project (or skip the following edits and use
my initial capistrano recipe gist). If you use my gist, change the
repository url to include your name.
Edit the file and change the following lines to include the vagrant port number “2222”:
role :web, '127.0.0.1:2222'
role :app, '127.0.0.1:2222'
role :db,  '127.0.0.1:2222', :primary => true
Also add the following lines to the namespace deploy do section:
run "ln -nfs #{shared_path}/spree #{release_path}/public/spree"
run "ln -nfs #{shared_path}/config/secret_token.rb #{release_path}/config/initializers/secret_token.rb"
Simple Capistrano Mistakes
Capistrano will only deploy changes which have already been pushed to the repository url supplied to the deployment service. It’s an easy mistake to commit development changes and forget to push them to the network repository. You’ll end up wondering why they don’t show up when you deploy to production, while capistrano can’t fetch anything not in the network repo.
Another thing to remember is that the branch matters. Capistrano will only pull the configured branch. So if you’ve been working on a feature branch, remember that you will need to merge or rebase those changes onto the branch configured in capistrano in order for those to make it to production (the “master” branch in our example here).
Let’s commit our changes:
git add .
git commit -m "enable capistrano"
git push
Finally, do a cold deploy:
bundle exec cap deploy:coldYou’ll be prompted for the spree user’s password (“spree” here). Enter it and go get a cup of tea.
If everything goes as planned, you now have a production server! If you point your browser at http://localhost:8081/ you’ll be able to see it.
Bluepill Errors
Sometimes the startup for bluepill reports failed sometimes when you deploy, complaining about spree.sock not existing or some other error. In my experience it’s usually succeeded anyway in this case, at least, so long as it’s bluepill throwing the error and not some earlier part of the deploy.
If spree hasn’t restarted, a manual restart will do the trick.
vagrant ssh
cd /data/spree/shared/log
sudo bluepill spree restart
tail -f unicorn.stderr.log
Watch the log for the unicorn workers to restart. You’ll have to enter the tail command pretty quickly after the restart, but spree takes enough time to come up that you should be able to catch it.
Ctrl-C will stop tail and you can log off the vagrant box.
Important Capistrano Commands
cap deploy- deploy to the default environment (w/o migrations)cap production deploy- deploy to the environment named “production”cap deploy:cold- deploy for the first time (migrations, starts instead of restarts)cap deploy:migrations- deploy and run pending migrationscap deploy:rollback- roll back the last deployment
Production and SSL
Note that at this point, since the vagrant box thinks it’s a production server, it will require ssl for checkout and the admin page. Since we don’t have ssl forwarded to the machine, you won’t be able to view either of those.
Unfortunately the view won’t be very interesting, since there won’t be anything in the store to sell, however. Which brings us to…
The Database
The point of this post is to help with migrating a real store, but we’re going to just set up sample data here. We’ll migrate the sample data to the new store. Since this store has no extensions or other complications, you may have a harder time with a real store. I’ll try to note the issues I’ve had with mine and how I dealt with them.
For now, generate some sample data:
vagrant ssh
cd /data/spree/current
bundle exec rake db:seed AUTO_ACCEPT=1
bundle exec rake spree_sample:load
Log off the box when it’s done.
You can check the store and see that it’s full of Spree products now. Yay!
Before we’re done, we’ll need to shut down this box.
vagrant haltImportant Rake Commands
bundle exec rake db:bootstrap- now deprecated, this was a spree-specific rake task which went through the full database setup, with sample data. See below for how to do this with two commands now.bundle exec rake db:reset- runs rake db:drop, db:setupbundle exec rake db:[create|drop]- create or drop the schema, but I find the mysql command line to be faster if you’re running just this one commandbundle exec rake db:setup- runs rake db:create, db:schema:load and db:seedbundle exec rake db:schema:load- load the schema from schema.rb, faster than running migrations when you’re starting from scratchbundle exec rake db:seed- load the basic seed data that all spree instances should havebundle exec rake railties:install:migrations- import the latest migrations from your updated gems into your appbundle exec rake db:migrate- run the latest migrations for your databasebundle exec rake db:migrate:rollback- undo the last migration - this is not always possible if the migration was not reversible
Here’s a StackOverflow post on rake commands going over more of the commands in detail.
Recovering from Database Screwups
If you’re working with sample data, it’s easy to erase mistakes and start over with a clean database.
bundle exec rake db:reset AUTO_ACCEPT=1
bundle exec rake spree_sample:load
I’ve occasionally run into an “unexpected token” error when reloading
sample data. The solution is to rm -rf tmp/cache and run both of the
above commands again.
Configuring the Project for Staging
We could move on to version 2.1 at this point, but if you’re serious about deploying an upgrade, you’re going to want to run through the entire process, including deployment, without taking down your real production server. That’s what staging is for.
We’ll need two things. The first is a staging environment file.
cd config/environments
cp production.rb staging.rb
vim staging.rb
Change the line with local requests to true (or use this 1.3 staging.rb gist):
config.consider_all_requests_local = trueThis allows error messages to be displayed in the browser. For pretty much all other settings, we want this file to match production since we’re using staging to test the production deployment process.
Save and exit.
The other thing we want to do is make it so we can go through everything on the staging server, including the checkout and admin interface.
Unfortunately, that requires using ssl, which is a pain to set up with vagrant. Instead, there’s another way. We’ll tell the project not to use ssl in staging.
Find the file config/initializers/spree.rb and modify the section (or
use this spree.rb gist):
Spree.config do |config|
  # Example:
  # Uncomment to override the default site name.
  # config.site_name = "Spree Demo Site"
  config.allow_ssl_in_staging = false
end
Save and exit. Now:
git add .
git commit -m "add staging"
git push
Configuring Capistrano for Staging
The other thing we’ll need is a capistrano staging configuration.
cd config
vim deploy.rb
Remove the lines (or use this capistrano recipe gist, changing repo username):
set :rails_env, 'production'

role :web, '127.0.0.1:2222'
role :app, '127.0.0.1:2222'
role :db,  '127.0.0.1:2222', :primary => true
and
set :branch, "master"After the first two lines in the file add:
set :stages, %w(production staging)
set :default_stage, 'staging'
require 'capistrano/ext/multistage'
Save and exit.
Now:
mkdir deploy
cd deploy
vim production.rb
Now add (or use this production.rb gist):
set :branch,      "master"
set :rails_env, 'production'
role :web, '127.0.0.1:2200'
role :app, '127.0.0.1:2200'
role :db,  '127.0.0.1:2200', :primary => true
Notice that the port number is different than the one we deleted from
deploy.rb.
Save and exit. Now:
vim staging.rbAdd (or use this staging.rb gist):
set :branch,      "staging"
set :rails_env, 'staging'
role :web, '127.0.0.1:2222'
role :app, '127.0.0.1:2222'
role :db,  '127.0.0.1:2222', :primary => true
This tells capistrano to address two different servers, one for staging and one for production. Since presumably you’ll be deploying to staging more frequently than production (you are testing and working through issues, right?), staging is set as the default target for capistrano.
Now, cap deploy will push the staging branch to the staging server.
You don’t need to specify anything else to target that server.
The deployment process will also deploy a different branch than master, the one we’ve used so far. This is so you can separate your work-in-progress from what’s pushed to the production server. It also allows the staging server to have a slightly different configuration than production so we can customize it if necessary.
When pushing to production, we’ll now need to specify that as the target
with the command cap production deploy. Everything else will work the
same.
Port Numbers
I’ve assigned the default vagrant ssh port, 2222, to the staging server. That’s because normally, you’ll be running the staging server in vagrant and using it frequently. Running production won’t happen in vagrant in the real world, so I’ve given it vagrant’s secondary ssh port, 2200. When you run a real production machine, you’ll just use the machine’s ip address instead of 127.0.0.1.
Because vagrant assigns the ssh port dynamically, this means that you’ll have to start the staging server before you start the production server. You won’t want to start the production server without the staging server running, otherwise it will be assigned port 2222 instead of 2200.
I know this is fragile and I don’t like it, but I haven’t found a simpler way to fix this.
In my experience, the setup I’ve provided in the Vagrantfile does that
automatically when you just run vagrant up. However, YMMV, and it
doesn’t hurt to pay attention to this step. If you get them backwards
for some reason, deploys will fail and you should be able to tell why.
If you’re in doubt, vagrant ssh to the machine and check which
environment is being called in /data/spree/shared/config/unicorn.rb
Let’s add these files to the repository:
git add .
git commit -m "add staging to capistrano"
git push
Configuring Vagrant for Staging
In order to test our staging server, we’ll need to create the server and
start it up. Note that we turned off the production machine in the last
section with vagrant halt, which is important.
Since we already have a Vagrantfile in the current folder, let’s make it work for both machines:
vim VagrantfileAdd the lines (or use this Vagrantfile gist):
config.vm.define "staging", primary: true do |staging|
  staging.vm.box = 'spree-base'
  staging.vm.network :forwarded_port, guest: 80, host: 8080
end
Save and exit, then commit the new Vagrantfile:
git add .
git commit -m "configure vagrant for staging"
git push
Let’s also set up a staging branch for our work with the staging server:
git checkout -b staging
git push -u origin staging
Git Workflow with Staging
There are many ways to do git workflow.
I’m going to do all of my work on the staging branch, which is the only branch which will push to the staging server.
Once I’m happy with the commits on that branch, I’ll merge them to the master branch, which pushes to production:
git commit -m "some staging work"
git push
git checkout master
git merge --no-ff staging
git push
git checkout staging
You may prefer a different workflow such as rebasing. I don’t think that will work if it removes the staging branch in the process, but I can’t really speak to that.
One advantage of not working on the master branch directly is that you can be interrupted while working on staging to fix some pressing issue on master. Just commit your staging branch without merging to master, go work on master (or branch from master and merge) and deploy, then switch back to staging.
Now:
# this will bring up both machines now
vagrant up
# this will connect to staging, the primary machine
vagrant ssh
sudo hostname staging-1-3
Use sudo vim to change “store” to “staging-1-3” in these two files:
-
/etc/hosts -
/etc/hostname
Log off the staging box, then:
bundle exec cap deploy:coldOnce that’s done, seed the database:
vagrant ssh
cd /data/spree/current
bundle exec rake db:seed AUTO_ACCEPT=1
Logout of the vagrant box.
Verify by going to http://localhost:8080/. You should also be able to visit http://localhost:8080/admin. Username is “spree@example.com” and password is “spree123”.
Leave the staging and production vagrant boxes running, which will be important for the next step.
Multimachine Vagrant
You can learn more by visiting the vagrant multimachine page. The
important thing to know is that when you use the multimachine syntax in
your Vagrantfile (as we’ve done), all vagrant commands will take a
machine name after the normal command, such as vagrant status staging.
Some commands will require a machine name, but ones that can operate on
both machines (such as vagrant up) will do so if you don’t specify a
machine. Be conscious of which machine you want to be affecting.
Also, you may or may not want to run multiple machines at a time, given your system resources. These boxes are fairly light, but they still have some weight. Sometimes you’ll need to have more than one machine on at a time. If your system can’t handle it, you’ll want to reconsider your development environment.
In particular, don’t try to get fancy turning machines on and off differently than outlined here, since the ssh ports will likely get confused and you’ll end up with errors. The safe approach is to get the machines up then not mess with them.
Spree 2.1
Now that we’ve got our old store set up, let’s get our new one.
On the dev machine:
cd ..
gem install rails -v 4.0.2
rails _4.0.2_ new store
mv store store-2-1
cd store-2-1
vim config/initializers/devise.rb
Paste (or see devise.rb gist):
Devise.secret_key = 'my secret is at least thirty characters long'Save and exit. Now:
vim GemfileThis looks mostly like it did for the 1.3 store (or see 2.1 Gemfile gist):
gem 'mysql2', :groups => :production
gem 'sqlite3', :groups => [:development, :test]
Find the unicorn line and change to:
group :production do
  gem 'unicorn'
  gem 'foreman'
end
Find the capistrano line and change to:
group :development do
  gem 'capistrano', '~> 2.15.5'
  # necessary due to a bug in 2.8.0 - if a later version works, just
  # drop this line
  gem 'net-ssh', '~> 2.7.0'
end
Also add these lines at the bottom:
gem 'spree', '2.1.4'
gem 'spree_gateway', :git => 'https://github.com/spree/spree_gateway.git', :branch => '2-1-stable'
gem 'spree_auth_devise', :git => 'https://github.com/spree/spree_auth_devise.git', :branch => '2-1-stable'
Save and exit. Now:
# this will throw an error
bundle install --without production test
# this will fix the error
bundle update
bundle exec spree install --auto-accept
Now we’re going to update to the “2-1-stable” branch instead of the published gem. The team is constantly fixing issues with spree, and many times I’ve had to address an issue by updating to the latest changes in the stable branch. I would have done this to the 1.3 store as well if it had been a real store.
vim GemfileReplace the spree gem line with (or use the final 2.1 Gemfile gist):
gem 'spree', :github => 'spree/spree', :branch => '2-1-stable'Save and exit. Now:
bundle update spree
bundle exec rake railties:install:migrations
bundle exec rake db:migrate
bundle exec rails s
Visit http://localhost:3000/ to test the store. Ctrl-C stops the server.
Updating the Bundle
When updating spree to the latest commit in the branch, the above set of commands will become familiar. We’ve just done a mini-upgrade of spree, from the 2.1 release to 2.1-stable latest. Those commands are a staple of maintenance.
One thing to be aware of is the difference between bundle update and
bundle update spree. You want to use the latter usually, not the
former. bundle update revisits every gem in the Gemfile, upgrading to
the latest if possible. There’s a much bigger risk of things breaking if
you update every possible gem, especially when you know most things are
working and you don’t need to. bundle update spree only updates the
spree gem and its dependencies, reducing the risk of change.
I used bundle update here since this is a new install and we want the
latest of everything as our starting point. Since this store’s never
been deployed, we don’t know a priori that earlier gems will be any
better than the latest in any case, unlike with known working code.
Git Again
We’ll do the exact same instructions from the “Setting up Git” section above:
git init
vim .gitignore
Add the following lines to your .gitignore (or same .gitignore
gist):
/config/initializers/secret_token.rb
/config/initializers/devise.rb
/config/database.yml
/public/spree/
/public/assets/
/.vagrant/
package.box
*.sql
*.tar
*.tar.gz
*.tgz
Save and exit. Next run:
git add .
git commit -m "initial commit"
You’ll also want to set up a store-2-1 repo on github. Go do that then
run:
git remote add origin git@github.com:username/store-2-1
git push -u origin master
Use your own username instead of “username” of course.
Staging for 2.1
We’re going to perform the migration and put it on a staging server. We’ll skip using a production server, since the process will be exactly the same as upgrading to the staging server. We use a staging server to make sure the entire process works flawlessly prior to upgrading the store, the same store which is actually in production and running our business.
Copy the following files from store-1-3:
VagrantfileCapfileconfig/deploy.rbconfig/deploy/staging.rb
In Vagrantfile, edit the port forwarding to forward port 80 to port
8082 for the staging machine (or use the final Vagrantfile gist). Also
comment out production since we won’t need it at the moment.
When you’re done with the migration, you may want to change this back to 8080 when you don’t need the 1.3 machines any more.
In config/deploy.rb, edit the repository url to point to
git://github.com/username/store-2-1 (or see the final capistrano
recipe gist). Also add the line:
run "ln -nfs #{shared_path}/config/devise.rb #{release_path}/config/initializers/devise.rb"to the deployment section with the other lines generating symlinks.
In config/deploy/staging.rb, edit the port to be 2201 (or see the
final staging.rb gist). This is the port assigned by vagrant to the
third machine brought up. That means that the 1.3 staging and production
machines will need to be up first. When you’re done with the two 1.3
machines after the migration, you’ll want to change this back to 2222.
Now:
cd config/environments
cp production.rb staging.rb
vim staging.rb
Change the local requests line to (or see the 2.1 staging.rb gist):
config.consider_all_requests_local = trueSave and exit. Now:
cd ..
git add .
git commit -m "add capistrano and vagrant"
git push
git checkout -b staging
git push -u origin staging
vagrant up
vagrant ssh
sudo hostname staging-2-1
Use sudo vim to change “store” to “staging-2-1” in both of these
files:
-
/etc/hosts -
/etc/hostname
Log off the vagrant box and run:
bundle exec cap deploy:coldVerify that it has come up by visiting http://localhost:8082/.
The Migration
Look at everything we’ve accomplished so far. Seems like a lot. And yet we still haven’t even talked about the actual migration process.
I wish I could say this were the home stretch, but in reality, most of the work will probably go into figuring out what has changed out from under your app in the move from 1.3 to 2.1.
The standard upgrade path is described at http://guides.spreecommerce.com/developer/upgrades/index.html. There are two guides, one from 1.3 to 2.0 and the other from 2.0 to 2.1. I’ll go over the process for both in one step here. We’ll be working on sample data with no extensions, which will be fairly straightforward.
The harder part will be adapting your particular environment. I’ll go over the specifics of how I was affected and what strategies I used, but you’re somewhat on your own here.
Upgrading in Stages
I recommend refining your upgrade procedure in trial stages:
-
uncustomized, vanilla store (as in this post) with sample data and no extensions
-
vanilla store with production data
-
full upgrade with extensions, customization and production data
-
the actual deployment
Only after you’ve successfully gone through the first three stages will you upgrade your actual production store. Additionally, in each stage, you’ll be deploying to a staging store, which tests the deployment process as well as the upgrade process. It’s good to close the deployment circle early and often.
The reason I break it up like this is that I really need to have a level of comfort with the upgrade process itself, in a vacuum so to speak, before I start working on the inevitable issues I’ll come against dealing with extensions and my customizations. That’s because it sucks to spend time chasing bugs in your code when it’s actually a problem with the upgrade process, and vice-versa.
Upgrading Development
Let’s start off by upgrading our project directory on the dev machine.
We’ll start with the Gemfile. Fortunately, this is easy since we already have our 2.1 directory set up.
Let’s also create a temporary git branch for our work.
cd store-1-3
# sometimes the cache interferes with upgrades
rm -rf tmp/cache
git checkout -b 2-1-upgrade
cp ../store-2-1/Gemfile* .
bundle install
Now we need to update the Rails environment files and the application config. Here’s where having the same application name from version to version helps. If your application names aren’t the same, you’ll need to update it in these files:
cp ../store-2-1/config/environments/*.rb config/environments
cp ../store-2-1/config/initializers/devise.rb config/initializers
cp ../store-2-1/config/application.rb config
Now let’s get rid of a migration which happens to be a duplicate from 1.3 to 2.1:
git rm db/migrate/*spree_promo_one_two.spree_promo.rbIn the following two sets of files, remove the lines which refer to “spree_promo”.
In the first set, also change “spree_core” to “spree_frontend”:
-
app/assets/javascripts/store/all.js -
app/assets/stylesheets/store/all.css
In the second set, also change “spree_core” to “spree_backend”:
-
app/assets/javascripts/admin/all.js -
app/assets/stylesheets/admin/all.css
Finally, let’s do the update to 2.1:
bundle exec rake railties:install:migrations
bundle exec rake db:migrate
bundle exec rails s
That’s it. Test the new store version at http://localhost:3000/.
Now commit our changes so we have a checkpoint:
git add .
git commit -m "upgrade to spree 2.1"
Missing Template “spree_application” Error
For the longest time I couldn’t figure out why I’d get this error sometimes on my dev machine when attempting the upgrade.
The instructions I give above avoid that error. The magic secret is:
rm -rf tmp/cacheFor some reason, this directory is the source of all kinds of weird errors whenever it doesn’t like what you’ve done. It’s now my go-to first response to any kind of unexpected error, for sanity’s sake. Don’t worry, the directory regenerates itself.
A Trial Deployment with Sample Data
I really like to close the circle to deployment as quickly as possible so I know that the basic process is ok before adding complexity.
We have a staging machine ready to do this. While this won’t be wholly indicative of how the deployment will go with 2.1, since we’ll be using the 1.3 machine to test here and our 2.1 app has a whole different repository and schema, but it will tell us that the regular spree process is sound. It’s important to have a working baseline.
You’ll want the 1.3 staging machine to have a copy of the sample data. We’ll go through the instructions to generate that as we did on the fake production machine.
vagrant ssh
cd /data/spree/current
# see https://github.com/capistrano/capistrano/wiki/upgrading-to-rails-4#asset-pipeline
rm ../shared/assets/manifest.yml
bundle exec rake db:reset
bundle exec rake spree_sample:load
Log off the vagrant box.
You can see that the staging server now has the sample data at http://localhost:8080/.
Since we’re not going to be keeping this git branch, I’m going to do the upgrade without bringing our changes into the staging branch. That means we’ll need to change the deployment file and push the current branch:
git push -u origin 2-1-upgrade
vim config/deploy/staging.rb
Change the branch to:
set :branch, "2-1-upgrade"Save and exit. Now:
git add .
git commit -m "test upgrade to 2.1"
git push
bundle exec cap deploy:migrations
If you get a bluepill error, ssh onto the vagrant box and
sudo bluepill spree restart, then
tail -f /data/spree/shared/log/unicorn.stderr.log. If you had the
bluepill error and haven’t done this, it will manifest as an unknown
column error “spree_products.count_on_hand” when you visit the
homepage.
If everything works, you’ll be able to see your new version of the store at http://localhost:8080/ again. You should refresh your browser cache just in case even though rails should ensure that the assets are refreshed anyway. Congratulations, this is a major part of the upgrade accomplished!
If it doesn’t work, you’ll need to troubleshoot. Sorry, you’re on your own here, but the spree google group and irc channel on freenode are a great help in this case, as are google and stack overflow. You’ll want to bring your data onto your development machine and use mysql, which again are out of scope for my post here.
As I mentioned, if you’re not really into my “new store” approach, at this point you could just integrate the changes into staging and then production, upgrading your real store and being done with it. At least, if you don’t have any application customizations or extensions. You can follow my suggestions for those in the following sections, or follow along with my entire process if you choose.
Extensions and Customizations
Extensions are the more straightforward of the two, so I’ll start with those.
As I mentioned at the beginning of this post, do your homework with regards to 2.1 compatibility before you begin the upgrade process.
I won’t upgrade an extension here, but here are tips and strategies:
- Upgrade one at a time - I generally do the easy ones first and add the harder ones last
- Use the github branches - usually you won’t have a choice, but always choose a stable github branch for your extension’s 2.1-compatible version. Count on needing to update when fixes come out as they come out.
- Not all extensions have migrations - when they do, you’ll need to use the railties and migrations-related rake and cap tasks. When they don’t, the documentation will usually not have those in the upgrade instructions
- Don’t reload your database - you should be testing deployment to your staging machine each time you onboard an extension. You can keep operating on the data we set up the first time, you don’t need to reload it. If things get too messed up though, you can always reload it the same way we did it the first time, so long as you tell capistrano to perform migrations.
- Don’t
bundle update. Once you’ve gotten a spree version locked in, you don’t want it to change while you’re doing the rest of this work. Otherwise you’ll have to go back and retest everything you’ve done.bundle installshould handle you for the most part when installing extensions. If there’s a gem conflict, trybundle update [gem]on the new gem for resolution before resorting to a spree update.
Now for customizations. Whatever your app overrides within spree, count on having to check whether it still works. This is another reason I like the “new store” approach, it allows me to bring in my customizations one at a time, starting with the easy ones.
Deface and view overrides tend to work, for the most part. Deface will at least throw errors in the development log which you can search for. Still, make sure to visit every customized view and see it with your own eyes.
With Spree 2.1, the biggest change to deface is the specification of erb tags. In the past, the deface selectors would specify outputtable erb code with “code[erb-loud]”, for example. The latest version of deface upgrades them from “code” to “erb” tags, so that would become “erb[loud]”. I had to find and replace all of these in my overrides.
Whenever you do a model or controller override using class_eval, you’ll need to verify that the overridden function hasn’t changed in how it works. If it has, you’ll usually need to update your override to incorporate the changes from the overridden code, such as method calls and instance variables.
With Rails 4, the mass assignment through the attr_accessible syntax has been deprecated and extracted to a separate gem, in favor of controller params whitelisting. You can read more about it here: http://guides.rubyonrails.org/upgrading_ruby_on_rails.html#upgrading-from-rails-3-2-to-rails-4-0. You’ll either need to add the gem which provides attr_accessible or update your code.
In Rails 4, the “match” directive in the routes file has been deprecated. You’ll want to replace it with the appropriate “get” or “post” verb. This is also described in the Rails update guide above.
In spree 2.1, views which used to provide @current_user instead now use the method spree_current_user. You’ll want to examine your deface and view overrides for these references.
In spree 2.1, some controllers which used to provide @order instead now use the method current_order. Update accordingly.
Testing the Full Production Migration
If you’ve held on this long, you’re almost out of the woods.
So the tricky part here is to get the old database into the new one. I’m not talking about just dumping the old database onto the new machine, schema and all. I’m talking about allowing using a fresh 2.1 schema and getting all of the old data into that. This can be a hassle if you don’t have all of the extensions done right, or if you’ve removed extensions in the past without removing their data from the database. It can be like trying to fit two legs into one-leg pants.
There’s also metadata about the schema in the database itself, which won’t be the same as the metadata from the old database. You’ll want to exclude this data from the transfer. It basically boils down to not bringing over the list of applied migrations, since the new schema already knows the applied migrations and the lists may not be the same.
You’ll want to perform this process twice, once to test the migration and deployment processes, and once for the actual final migration. Usually I’m building a new server with the new version and then switching over to it rather than upgrading my old server in place, but either approach works. Whichever approach you take, when you’re doing the production migration, you’ll need to take down your store site from the outside world while the data is being migrated so that no new data makes it into the old store.
The practice run will be done with the staging box, while the production upgrade will be done however you choose, to a new server or to the old one. The only thing to note about upgrading the old server in place is that you’ll need to hold the old and new schemas in mysql at the same time, which means they’ll need different schema names and you’ll want to update your database.yml file to point at the correct schema when you switch to the new one. I won’t go into that here.
Let’s get the database from the production machine. You’ll be doing this on a real production box, but since I’ve only got the fake production box here, these instructions will look the same as when I did it for the test migration. Remember that you’re going to be using a real machine, so you’ll have to adapt my instructions here to your environment.
We’ll also get a copy of the uploaded assets directory, although we won’t need this until later.
# you'll be ssh'ing to your machine instead
cd store-1-3
vagrant ssh production
# you'll use a local directory instead
mysqldump -uroot spree > /vagrant/spree-1-3.sql
cd /data/spree/shared
tar cvf /vagrant/uploads.tar spree
Copy the sql file to your dev machine in the store-1-3 directory, then log off the box.
Now we’ll put it on the 1.3 staging server for the migration process. If you were using mysql in development, you could just as easily do this on your dev machine, but I don’t have mysql on this one. Fortunately, the staging machine is fine for this purpose. All we need it to do is run the migrations for us.
cd store-1-3
vagrant ssh
mysql -uroot
drop schema spree;
create schema spree;
exit
mysql -uroot spree < /vagrant/spree-1-3.sql
Now we just need to run the migrations. Since we’ve already deployed the 2.1 upgrade to the 1.3 machine, all we need to do is to tell it to migrate the database:
cd /data/spree/current
bundle exec rake db:migrate
Finally, we’re going to export the migrated data to be imported into the clean 2.1 store. We’re going to use the mysqldump command again, but this time we’re going to tell it to leave out the schema_migrations table. We’re also going to tell it not to include table drop/create instructions, since the table schemas we want are already created in the new database. Finally, we’re going to tell it to include the column names in the dump since the default insert command is based on column ordering, which may also have changed.
Important Mysqldump Parameters
-t- don’t include table drop and creation commands-c- include column names instead of inserting by position--ignore-table=[database].[table]- don’t include the specified table in the dump
mysqldump -uroot -tc --ignore-table=spree.schema_migrations spree > /vagrant/spree-2-1.sqlLog off the vagrant box. Now:
mv spree-2-1.sql ../store-2-1
# we'll need this now
mv uploads.tar ../store-2-1
cd ../store-2-1
vagrant ssh
cd /data/spree/current
mysql -uroot
drop schema spree;
create schema spree;
exit
bundle exec rake db:schema:load
mysql -uroot spree < /vagrant/spree-2-1.sql
cd /data/spree/shared
tar xvf /vagrant/uploads.tar
If everything goes well, you should be able to see the clean, upgraded store at http://localhost:8081/.
If not, you’ve probably got some data in your database from tables which no longer exist in your new version. If you get complaints about tables not existing, you’ll have to edit them out of the sql file and reimport. Remember what you’ve done because you’ll need to do it all again when you upgrade the store for real.
You’ll also need to clear out the 2.1 staging server’s database before importing again. You can do that with the mysql schema commands.
There are also command line switches for mysql which would let you roll back the import if it were to encounter an error, in which case you wouldn’t have to clear the database out. Unfortunately I don’t recall what those switches were.
Once you’ve got it all working, spend some quality time with the staging store and really make sure everything is working. Go through some fake purchases. Pay attention to the details. This is your last chance to save yourself from mistakes you’ll have to fix in production.
Vagrant Shared Folders
By default, vagrant uses the virtualbox shared folders facility to mount
the Vagrantfile’s directory into the vagrant box at /vagrant.
I’m using it here to pass files between the boxes which you’d normally need something like scp or sshfs for.
While it works fine for these individual files, don’t try running your rails app out of the shared folder. Unless you configure shared folders for NFS, it’s fair to call their performance excruciatingly slow for large numbers of file accesses.
The Final Countdown
Now that we’ve seen everything working in staging, we’ve had plenty of practice getting things out to production. I won’t even go through the actual commands. Consider it your final exam. I’m sure you’ll do fine.
The things to remember are:
-
Close off access to your production machine prior to this process. Give yourself plenty of time, at least a couple hours, in case there are snags. Let your customers know when the site is expected to be back up, and how to contact you through other means in the meantime, if appropriate. Also notify your other store admins and close off their access as well. You don’t want anyone changing anything while you’re migrating.
-
If you’re moving to another server, don’t forget your ssl certs! I haven’t discussed that at all. In fact, I proxy from a separate machine, so even when I add a new spree server, I just repoint the proxy without having to mess with the certs. I don’t necessarily recommend that setup, but it’s handy in this case.
-
Bring both the database contents and the uploads directory to the new machine after you’ve closed off the old store from the outside. You’ll need the uploads just as much as the data.
-
Have fun with it. Just kidding, this process is undoubtedly tough, but what can you do? Follow this post! It makes it easier, I swear. :)
Also, if you use the vagrant box for staging which I’ve outlined here,
don’t forget to set the application name to match yours in the box’s
/data/spree/shared/config/secret_token.rb file, and to use actual
secrets rather than my slugs.
Coda
I meant to write some other stuff as well, but this should keep you busy enough I think. I’d love feedback and will try to incorporate good suggestions into the post. Thanks for reading!